How to install Umbraco using Visual Studio NuGet IIS and SQL Server
05 Apr 2016
This post gives you a step by step guide on how to install Umbraco on your local machine using Visual Studio, NuGet, IIS and SQL Server.
What you will need?
Visual Studio 2010 or higher
ASP.NET v4.5 installed on your machine
SQL Server 2008 or higher. SQL Express works fine as well as the full version.
IIS 7 or higher
Administrator permissions in Windows
You can now follow along with this video
Create the project in Visual Studio
Open up Visual Studio in Administrator mode.
If you want to set it to always open in administrator mode you can do it like this:
In Windows Explorer, go to:
C:\Program Files (x86)\Microsoft Visual Studio 14.0\Common7\IDE
or whichever version you have installed.
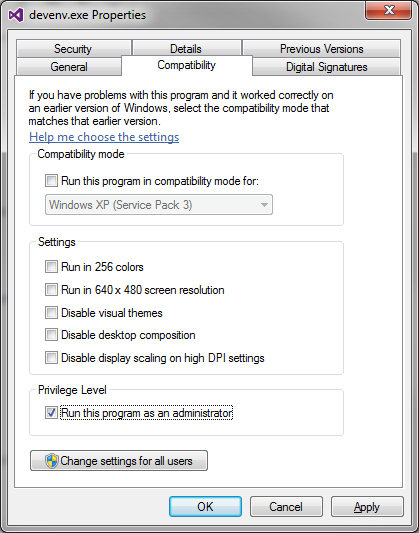
Right click on devenv.exe and click on Properties
In the Compatibility tab, Tick the box under Privilege level which says Run program as an administrator
In Visual Studio
Go to File > New > Project
Then click on Templates > Visual C# > Web
Click on ASP.NET Web Application
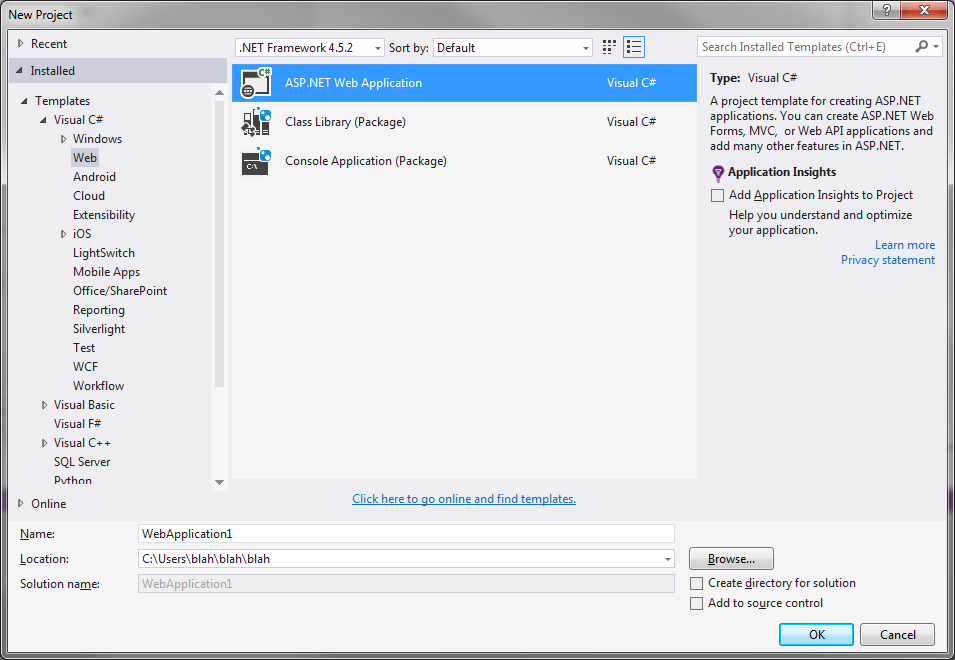
Give your project a name
Choose the location where you want the project to be saved
I untick the box which says "create directory for solution".
Press OK
Choose the Empty Template and tick the box that says MVC under the title Add folders and core references for:
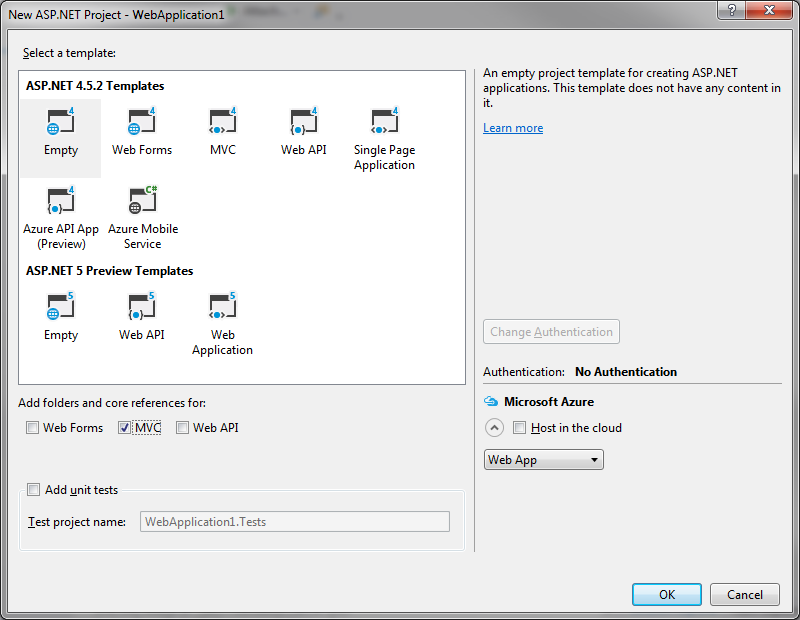
Then click on OK
Create the database in SQL Server
Open SQL Server Management Studio
Right Click on Databases and create a new database.
Give the database a name
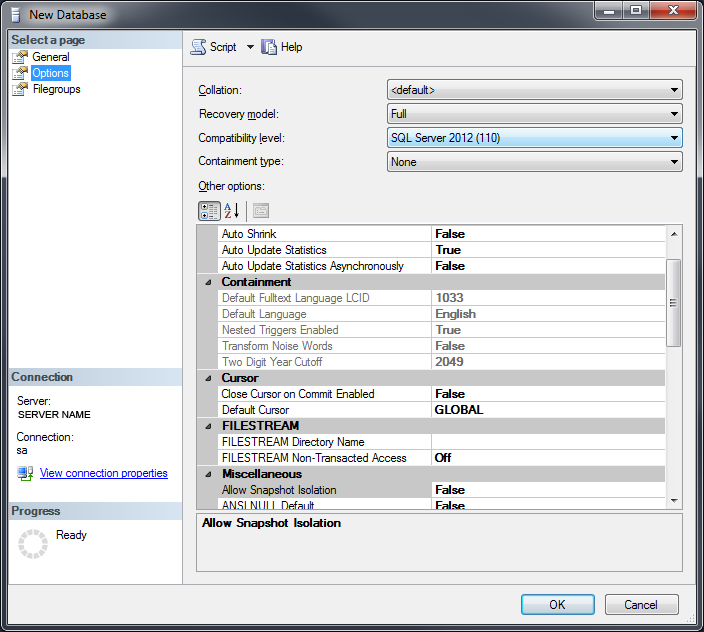
Click on the options page and make sure the Compatibility level is set to the highest. Mine is SQL Server 2012 (110) as that's the version I have installed.
The lowest it can be is 2008.
Clik on OK
Now you need to create a user login with permissions to access the database
Under Databases is Security.
Open out security by clicking on the plus sign next to it.
Right click on Logins and choose New Login...
Choose a name for the login. I usually name it the same as my project name.
Click on SQL Server authentication
Enter a password, and confirm password
Untick 'Enforce password policy'

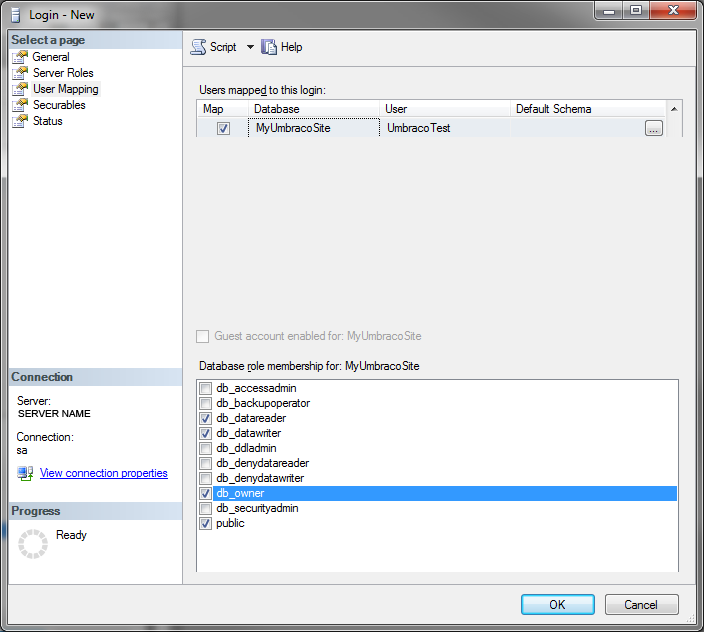
Click on the User Mapping page.
Find your database
Tick the box next to your database name.
Underneath the database list will be the list of permissions for the user on that database if you ticked it.
You need to choose reader, writer, owner and public.
Click on OK.
Install Umbraco using NuGet
In Visual Studio, click on Tools > NuGet Package Manager > Package Manager Console
This will open up the Package Manager Console window in Visual Studio.
Make sure the cursor is flashing next to PM> and enter the following:
Install-Package UmbracoCms
Then press enter.
This will go off and get the relevant packages needed for the latest version of Umbraco to be installed.
Don't be fooled if you see it says Umbraco Successfully installed. It has more to do yet. Make sure you have done the next bit.
It will ask you if you want to overwrite Global.asax, you can say yes to this by entering Y for yes or A for yes to all which is also fine.
Build and run the project to finish the installation
Now you want to run the website so you can connect it to the database and finish the rest of the installation.
Click on Build > Build Solution.
Now click on Debug > Start without Debugging.
It should open the Install Umbraco web page.
Enter a Name, email address and password. (you will need these later)
Then click on Customize
In the database type dropdown choose Microsoft SQL Server
Remembering the details of the database you created earlier, enter the SERVER name, Database name, Login and password. Leave the 'Use integrated authentication' checkbox unticked.
Click on Continue.
Now you have the opportunity to install one of the starter kits.
I recommend you do this if you've not used Umbraco before and would like to see an example of how things are put together.
If you have used Umbraco before and prefer to have a clean installation then click on the link underneath which says No thanks.
Once it is finished you will be redirected to the Umbraco admin page for your new site.
Congratulations you have set up Umbraco.
Setting up the site to run in your local IIS
If you want to be able to run the site from a url like http://mywebsite.local/ instead of http://localhost:32435/ do the following.
Open up IIS Manager.
Open out the server, right click on Sites and click on Add Web Site.
Give the site a name, you can have spaces in it. This is just the name that will appear in IIS.
In the physical path box, click on the button next to it to browse to the location of the folder which contains your new web project. You need to select the folder which contains the other folders call App_Browsers, App_Data etc.
Leave the type to be http, IP address to be All Unassinged and the Port to be 80.
In the host name, enter the url you would like on your local machine. I usually have something like websitename.local
leave the checkbox ticked for Start Web site immediately then click on OK.
You now need to make sure the application pool is configured properly.
In IIS above Sites, click on Application Pools.
Find the application pooled which is the same name as the name you gave your website.
Right click on the application pool name and click on Basic Settings.
Make sure the right .NET Framework version is chosen i.e. v4.xxx
Make sure Managed pipeline mode is set to integrated.
Leave Start application pool immediately ticked.
Click on OK.
There are 2 more things you need to do
Windows File Permissions
Go to the folder of your site where you pointed IIS to.
right click on the folder, Choose Properties. In the security tab click on Edit permissions the Add..
Click on Advanced > Locations > Your computer name
Press OK
Click Find Now
Scroll down to IIS_IUSRS, select it and press OK. Then OK again.
In the list of groups or user names, select IIS_IUSRS and tick the boxes Modify, Read & execute, List folder contents, Read and Write.
Press OK
Make your url work on your machine.
Open Notepad as an administrator by right-clicking on it in the start menu and choosing 'Run as administrator'
Click File > Open > C:\Windows\System32\drivers\etc
Above the open button where it says TextDocuments (*.txt) change it to All Files (*.*)
Then click on the file named hosts and click on Open.
Add a new line at the bottom of the file like this:
127.0.0.1 websitename.local
The number on the left is the IP address where you want that url to point to. Leave it as 127.0.0.1 so it points to your machine. the address on the right is the address of your site. Notice that it doesn't need http:// in front of if here.
Save the file.
Set the website address in Visual Studio
In Visual Studio, in the Solution Explorer window, under the solution name, right-click on the web project and choose Properties at the bottom of the menu.
In the menu on the left-hand side of this window click on Web.
In the Servers section, choose Local IIS in the dropdown and change the project url to be the one you set up in IIS. i.e. http://websitename.local/
Click on save.
Now build the solution by going to Build > Build Solution
If it fails with a message saying it can't open the .dll file because it is being used by another process build it again.
Open your browser and enter the url of your site.
If you installed one of the starter kits it should take you to the home page of the site.
If you didn't install a starter kit it will take you to a page which says Welcome to your Umbraco installation and invites you to open Umbraco.
You may need to login to Umbraco. This will be the email address and password you supplied when running the install.
If you are using source control I would suggest you check in the files at this point, and make a backup of the database so you have something to go back to without having to do the whole thing again.
That should be all. If I have missed anything or you would like more detail on anything, please leave a comment below.
